PLEASE READ THE IMPORTANT UPDATES
BELOW BEFORE EMBARKING ON A SIMILAR
REPAIR TO YOUR OWN FAILED UNITS
I describe on these pages a DIY repair for misted
sealed double glazing units. The repair involved a fair bit of
DIY work, but cost me a great deal less than either replacing
all the window frames in my home or replacing only the sealed
units.
The existing glass, aluminium spacers and plastic
parts of the failing sealed units were all reused, and the cost
of the work was the price of glazing silicone sealant, moisture absorbing
desiccant and some Stanley knife blades and windows cleaning
materials.
|
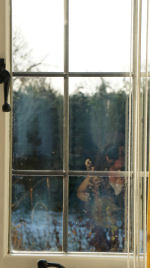
BEFORE

Failing sealed double glazing unit - moisture
induced misting developing between the panes... |
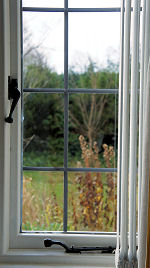
AFTER

After the repair - misting gone and as clean
as you make them....... glass, spacer bars and corner keys all
re-used. |
I can't say for sure what the life of the DIY
repair will be - but given the huge cost of replacement double
glazing I think it is worth a shot. I've provided the
information below on how I went about the repair for information
only - not as a recommendation for others to follow - it might
be of interest to other like-minded DIY'ers.
After about 6 months all the repaired units have
remained clear and without signs of problems - so far so good!.
UPDATE MAY 2014 Thanks
for the comments from visitors who have found the site of help!.
A couple of emailers have made a point worth sharing. They have
commented that general purpose silicone sealants do allow
moisture to permeate - so the issue with my repair failures may
still have had a contribution from inadequate sealing. One
commented that commercial unit sealing methods normally use
polysulfide or hot-melt butyl, and another suggested that using
butyl tape to cover the silicone sealant may assist in the
sealing. The latter emailer also suggested that trying to use a
"neutral cure" silicone sealant would be better. I hope this will
be of further help to anyone thinking about making their own
repairs...
UPDATE DEC 2012 I've decided in the end to
go back to using professionally made sealed units for the
windows. The re-misting that I described in the April '12 update
has continued even with the re-conditioned glazing desiccant. It
might have been better with new glazing desiccant (if I could
get it in small enough quantities) but it looks like the repair
method described is likely to be one of limited life.
The re-misting is induced by heating by the sun and
disappears again when the repaired units cool down - so it does
still look like a desiccant moisture retention capacity
limitation....
The DIY repair might still be worth trying if you
have a small number of units which are easily removed and worked
on and can get good quality dry desiccant. But with my larger number of units in old frames I've
decided to replace them using the normal methods....
UPDATE APRIL 2012 After about 12 months in
situ some misting has returned to some of the refurbished units.
This misting is different in character to the original problems
however. It appears when the sun has warmed the frames and
appears to be moisture released by the desiccant when it is
warmed up.... Once the frames cool back down the misting
disappears - the desiccant re-absorbs the moisture.
After some further investigation it looks like this
is due to the replacement desiccant I used. In particular it appears that
the general purpose silica gel I used to replace the saturated
glazing desiccant was not itself fully free of moisture. There
is a remedy for this, but importantly the remedy can also be
used to re-condition the glazing desiccant already in the sealed
units. If only I knew this at the start - we live and learn!
More about the additional step required to
recondition the desiccant here....
BACKGROUND TO THE PROBLEM
Twelve or thirteen years ago I replaced the
troublesome single pane windows in my home with sealed double glazing
units. Cash was tight at the time (new home and young family) and we couldn't afford to
completely replace all the windows - so I measured-up and ordered sealed units
and fitted them myself to the
existing timber window frames which were themselves still in reasonable
condition.
It can't be expected that sealed double glazing
units units will last as
long in frames designed for single panes as they would in
properly designed frames - however I've managed a creditable 12/13 years from
the sealed units on the sunny side of the house; these have only
now started to show signs of failure and are starting to mist up
(image right).. Most of the other units I fitted are still going
strong. The cost of fitting the individual sealed units
was probably about 5-10% of the cost of getting a double glazing
firm to replace all the windows completely - so I think it was a
good choice at the time.
The question however is what to do with the
units that are starting to fail. The cost of completely replacing
the windows is still very high (even if I could find designs that are
similar to the existing timber frames) and this seems to me to be a very expensive
solution to the problem - especially considering that the
problem is primarily a sealing issue. There is not likely to be
much or any significant damage to the glass and spacer bars used
in the sealed units. I could just replace the sealed units with new
ones - but this also seems a complete waste of good materials, and
introduces the problem of disposal of the failed units.
I decided to see if I could repair the failed units
- if this was possible I could re-use all the existing sealed unit
materials, do the work in my own time when convenient and save a
considerable amount in the process.
WHAT GOES WRONG WITH SEALED UNITS AND A POSSIBLE
FIX
|

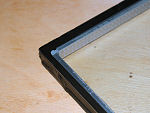
Sealed unit construction... |
Standard sealed double glazing units such as those
I have consist of two panes of glass with a hollow (typically
aluminium) spacer frame sandwiched between them (the silver part
in the image). The outer edge of the spacer is sealed during
manufacture using a glazing sealant (the black material in the
above image) to form an airtight barrier between the panes.
The hollow spacer bar inner faces are perforated; the bars are filled
with a moisture absorbing desiccant which is there to remove
moisture from the air trapped between the panes. With the
moisture thus removed by the desiccant there is no water vapour
available to condense as liquid on the inner faces of the glass
panes when the temperature drops - so the sealed unit remains
clear in circumstances in which single panes would "steam-up".
If the seal fails for any reason (and it doesn't
take much of the seal to de-bond from the glass to cause a
failure) external moisture-carrying air can enter the sealed
unit. The desiccant in the spacer bars will continue to remove
this moisture, up until the point at which the desiccant becomes
saturated and can't absorb any more water - the humidity level in the
gap then
rises and liquid water can start to condense on the cold
inner surface of the glass. The glass stains and because it is
on the inner surfaces, frustratingly,
can't be cleaned.
My tentative plan was to try and split open a
failed sealed unit, clean the glass, replace the desiccant and
re-seal the whole unit...... a much lower cost solution than
throwing out and replacing the windows.
IMPORTANT
A number of important factors made it
possible for me to attempt these repairs - and because
window installations vary so much the approach I describe may
not be suitable for all.
1. My windows were accessible - all my
failed units were on the ground floor and accessible from
ground level. If you have windows on upper floors it may be
wise to leave their repair to professionals.
2. All the failed units were of a size and
weight that made them comfortable to handle by myself. If
you have larger heavier windows you may wish, again, to leave them
to professional repairers.
3. I knew how to remove the sealed units from
their frames without damaging either the units or the
frames. If you can't do this then this type of repair isn't
really an option for you.
4. I have good working space available, and
was able to leave the repaired unit(s) out of the window
frames for up to 6 hours to allow the new sealant to set.
This type of repair activity is best attempted in warm
weather with good day length (ie not in winter).
5. I am fairly good with my hands - if you
are all thumbs don't attempt this. The approach involves
working with sharp blades and dismantling the window
components without damaging them, then putting them back
together and re-fitting them in their frames.
6. I have backup arrangements to replace
glass if I break any in the repair process, or to board up
the window if, due to unforeseen circumstances, the repair
takes longer than expected. If you want to try this type of
thing give some thought to what you might do if you can't
get the repaired sealed unit back into your window in time.
If any of these conditions do not apply then
you could easily get into difficulties attempting this type
of repair. I provide the information on how I went
about it only for
reference for competent DIY'ers - not as a recommendation
for all.
On to page
2 - to see how I got on.......